Sync System Email Templates to all companies.

Challenge / Problem: Maintaining email templates across multiple companies.

Descritpion: Dynamics AX makes use of email templates for various bits of functionality in Dynamics AX, including workflow notifications and alert notifications. If you are using workflow in multiple companies and want to keep the same workflow template across the board, it can be quite frustrating to have to make the same changes in every company. The following script/job in X++ will help sync all (or some) system email templates and their respective languages into every company in Dynamics AX.

/// Copies All System Email Template to all companies
/// WARNING: Will create or overwrite existing templates in other companies
static void syncWorkflowTemplates(Args _args)
{
    DataArea  DataArea;
    SysEmailSystemTable email;
    SysEmailTable local;
    SysEmailMessageSystemTable message;
    SysEmailMessageTable localMess;
    WorkflowParameters params;

    void FindOrCreate()
    {
        local = SysEmailTable::find(email.EmailId, true);
        if (local.RecId)
        {
            info(strFmt("Deleting %1 (%2)", local.EmailId, curext()));
            local.delete();
        }
        local.DefaultLanguage = email.DefaultLanguage;
        local.Description       = email.Description;
        local.EmailId           = email.EmailId;
        local.Priority          = email.Priority;
        local.SenderAddr        = email.SenderAddr;
        local.SenderName        = email.SenderName;
        info(strFmt("Adding %1 (%2)", email.EmailId, curext()));
        local.insert();
    }

    void FindOrCreateMessage()
    {
        localMess.clear();
        localMess = SysEmailMessageTable::find(message.EmailId, message.LanguageId, true);
        if (localMess.RecId)
        {
            info(strFmt("Deleting %1 %2 (%3)", localMess.EmailId, localMess.LanguageId, curext()));
            localMess.delete();
        }
        localMess.EmailId       = message.EmailId;
        localMess.LanguageId    = message.LanguageId;
        localMess.LayoutType    = message.LayoutType;
        localMess.Mail          = message.Mail;
        localMess.Subject       = message.Subject;
        localMess.XSLTMail      = message.XSLTMail;
        info(strFmt("Adding %1 %2 (%3)", localMess.EmailId, localMess.LanguageId, curext()));
        localMess.insert();
    }
    ttsBegin;
    // Restrict to specific templates in a where clause if necessary
    while select email
    {
        while select DataArea where !DataArea.isVirtual && DataArea.id != email.dataAreaId
        {
            setPrefix(DataArea.Id);
            changecompany (DataArea.Id)
            {
                FindOrCreate();
            }
            while select message where message.EmailId == email.EmailId
            {
                changecompany (DataArea.Id)
                {
                    FindOrCreateMessage();
                }
            }
        }
    }

    ttsCommit;
}

Model Management: Tools – Eventing II (validateWrite)

Following up on my previous post on the use of Eventing for model management today’s post will demonstrate how to use eventing effectively on the validateWrite method of tables. This can be very useful for additional model specific data validation without overshadowing the original method.

In this example I will use the validateWrite of the PurchReqLine table.

Instructions

1. Create a new class e.g. MyPurchReqLineEventHandler

Screen Shot 2014-10-22 at 9.06.50 AM
2. Create a new static method in this class e.g. public static void validateWritePurchReqLine(XppPrePostArgs _args)
3. In the class retrieve the current boolean return value so that you can take it into account: boolean ret = _args.getReturnValue();
4. Get the original PurchReqLine Table record so that you can use it in your logic: PurchReqLine line = _args.getThis();
5. Add your logic to the method taking into account the current return value e.g.
if (ret)
{
ret = purchReqLine.myField != “”;
}
6. Set the return value (either at the end of your method or within the if (ret) statement: _args.setReturnValue(ret);

Screen Shot 2014-10-22 at 9.24.58 AM

7. Create the event subscription
7.1 Navigate to the PurchReqLine table in the AOT
7.2 Expand the methods section.
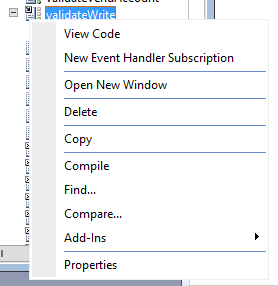
7.3 Right click on the validateWrite method. Click “New Event Handler Subscription
Screen Shot 2014-10-22 at 9.20.55 AM
7.4 Rename the Subscription to a name that reflects your model
7.5 Modify the CalledWhen property of the Subscription to “Post”
7.6 Modify the Class property of the Subscription to “MyPurchReqLineEventHandler”
7.7 Modify the Method property of the Subscription to “validateWritePurchReqLine”
Screen Shot 2014-10-22 at 9.33.41 AM
7.8 Save the class.

You’re all done. Now test and enjoy.
Please let me know if you have any comments or suggestions on the above. Keep an eye out some more samples like this in the next few days and weeks.