Install .Net 3.5 offline

Issue: One cannot install SQL Server required for Dynamics AX without .Net 3.5 on a server with limited internet access

Description: One of the obvious requirements for installing Microsoft Dynamics AX is SQL Server which in turn requires the .Net Framework 3.5 to be installed as one of Windows features. However both the Windows feature installer as well as the download versions of .Net Framework 3.5 require an active intenet connection to Window Update servers even if you have the Windows install files. If you do not have this connection due to some reason like a corporate proxy etc installation can be big problematic.

There is hope though. One can force the installation from the Windows disk using the following technique.

1. Insert your Windows installation disk into your computer or mount the disk image.
2. Open a command window running with Administrative privileges
3. Enter the following command: “Dism.exe /online /enable-feature /featurename:NetFX3 /All /Source:E:\sources\sxs /LimitAccess” replacing “E:\” with the path or drive of your windows install disk
4. Press enter and .Net 3.5 will install.

Many thanks to Reza Faisal for saving us many hours with your article on this, it has saved myself and my colleagues much frustration. View the article here: https://support.microsoft.com/en-us/kb/2785188


10. My checklist for debugging X++ code

As part of my series on “Things new X++ Developers Should know”. I have been writing a few basic howtos and checklists for new X++ Developers. These are really meant to be simple step by step guides to get new developers more productive by exposing the little secrets of the AX development that sometimes take years before discovering.

Today’s post is a checklist of things you need to have in place to ensure that you can debug X++ code.

  1. Enable debugging for your user. In an AX development window click on the tools menu item, then click options. Click on the development fast tab. Under debug mode set the option to “When Breakpoint”Enable_AX_Debugging
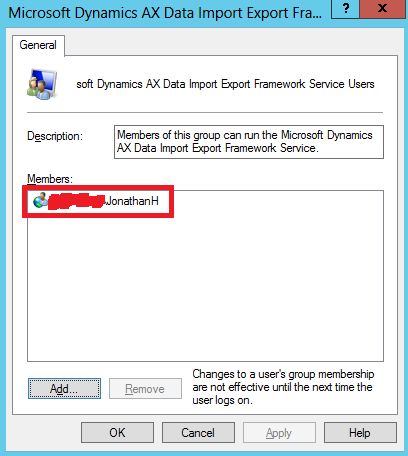
  2. Ensure your user is part of the local “Microsoft Dynamics AX Debugging Users” user group. On the machine which you are running the debugger on Edit your users and groups.
    2015-05-25_1545
    Expand the “Groups” section and double click on “Microsoft Dynamics AX Debugging Users”. Click “Add” and enter your domain name and click ok.
    2015-05-25_1546You will need to restart your user session by logging off and back on again
  3. Ensure the server is enabled for debugging (needed for serverside code). Open up the Microsoft Dynamics AX Server configuration console from Windows administrative tools. On the “Application Object Server” tab enable “Enable breakpoints to debug X++ code running on this server” and “Enable global breakpoints”
    Enable server breakpoints
  4. Enable client debugging options (optional/advanced for business connector debugging). In the Microsoft Dynamics Client configuration console in Windows administrative tools enable the following: “Enable user breakpoints to debug code in the Business Connector and Enable global breakpoints to debug code running in the Business Connector or client.
    2015-05-26_1449
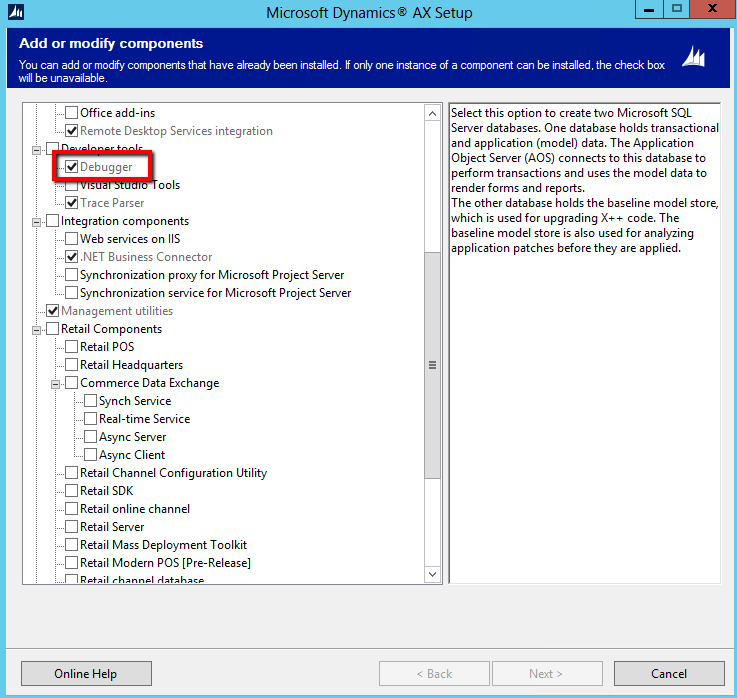
  5. Ensure the debugger is installed on the client machine. Run the Microsoft Dynamics AX installer and ensure the “Debugger” (found under development tools is installed)
    2015-05-26_1452
  6. If your code is running in CIL:  You can either follow the steps listed on MSDN https://msdn.microsoft.com/en-us/library/gg860898.aspx or for simple debugging (i.e. logic errors) set your user to not run business logic in CIL via your user options form:
    2015-05-26_1510
  7. Finally and most obviously you need to create breakpoints. You can do this in three ways.
    1. Navigate to the line of code that you want to debug. Press F9
    2. Navigate to the line of code and press the “Red circle” on your toolbar.2015-05-26_1502
    3. Finally you can physically type “debug” in your code to create a breakpoint. However this will enable it for all users in the system, not just for yourself.
      2015-05-26_1503

I hope this checklist will help somebody stuggling with their debugging in AX. Please let me know if there are additional tips for debugging that this list may be missing.

For some additional details on debugging see MSDN:
https://msdn.microsoft.com/en-us/library/gg860898.aspx

Find all Menuitems Linked to a Form

For diagnostics purposes it is often useful to search the AOT for all objects matching cetain properties. For example you may want to find all display menutitems that are pointing to a specific form. The below job illustrates how to simply traverse the Display Menuitems node in the AOT to locate all items who’s “ObjectType” is “Form” and object is a specific form name. E.G. “PurchReqTable”.

static void FindMenuItemsForForm(Args _args)
{
 #AOT
 str find = "PurchReqTable";
 TreeNode root = TreeNode::findNode(#MenuItemsDisplayPath);
 TreeNode current;
 TreeNodeTraverser trav = new TreeNodeTraverser(root,false);
 
 current = trav.next();
 while (current)
 {
 if ((current.AOTgetProperty('ObjectType') == "Form") && (current.AOTgetProperty('Object') == find))
 info(strFmt("Found menuitem %1",current.AOTname()));
 current = trav.next();
 }


Search_AOT

Adapting this to search other nodes is as simple as changing the original node instantiation to search a different path as well as changing the AOTgetProperty() method to search through the properties relevant to you.

Happy Daxing

Original community post: https://community.dynamics.com/ax/f/33/p/161258/387257#387257

14. Using Alt+[Up/Down] to rearrange the order of elements in the AOT.

As part of my series on “Things new X++ Developers Should know”. I have been writing a few basic howtos for new X++ Developers. These are really meant to be simple instructions to get new developers more productive by exposing the little secrets of the AX development that sometimes take years before discovering.

Today is the simple trick of moving elements up and down in list in the AOT using your keyboard. E.G. Re-arranging fields in a grid control or field group. Sometimes the mouse re-arranging produces unexpeded results and is quite frankly much slower.

  • Simply highlight (click on) an element of an object that makes sense to re-order e.g. a column in a form grid.
  • While holding in the “ALT” key use the up and down arrow keys of your keyboard to move the object up and down in the list

Reorder_AOT_Elements

Notes on this functionality:

  • This functionality only works where it actually makes sense i.e. where where order actually matter like on grids and field groups. E.G. Moving your control above “methods” (in the screenshot) will have no effect and will automatically move it back down to directly below “methods” on re-opening the aot element.
  • This functionaly will do nothing on set elements in an Object e.g. “Methods”, “Datasources”, “Designs”, “Parts” etc…
  • If you’re a little OCD like myself and would like to re-arrange the fields (in the fields node) on a table object they will move when using Alt+[Up/down], but the change will not be permenant, even after saving. Field order doesn’t really make much difference in AX, apart from readability in the AOT. So if you want the primary key to be at the top of the list, then you must create it first (I haven’t found a workaround yet).
  • The same applies for ordering of methods in classes. The methods physically move but the change is not permenant
  • As above, even though you are physically able to, reordering the tables in the AOT makes no difference. They will always be revert to being alphabetical after re-opening the AOT.
  • Re-ordering objects in an AX development project does work! The elements will stay in the order that you arrange them.


8. Locate specific AOT object without scrolling

As part of my series on “Things new X++ Developers Should know”. I have been writing a few basic howtos for new X++ Developers.

Today’s post relates to quickly navigating to specific objects in the AOT without endless scrolling.

So often when working over the should of new developers or consultants exploring the AOT I see them scrolling endlessly or dragging the scrollbar back and forth for a while before finding the object they are looking for.

A common technique to navigate through lists in both Windows (e.g. My computer etc) and windows based environments (SQL management studio etc..) is to simply start typing the name of the object you are looking for. Windows automatically moves to the first object matching the sequence typed.

AX is by no means an exception to this rule. Simply click and expand the main node of the object you are looking for e.g. “Forms”
AOT Navigation Forms
and start typing E.G. “PurchReqT…..”
AOT_Navigation_Type_PurchReqT
As you type AX will move to the first object found matching what you have typed so far..
E.G. P moves to PartitionAdministration,  Pu to PurchArgreement etc….

There are some bonus features when using this in AX:
1. You can always see what you have typed so far by looking at the bottom left of your screenAOT_Navigation_Status_Bar
2. The typing timeout is long compared to applications like SQL etc where you need to have taken a speed typing course to get this right. As long as you still see the search term in the bottom you can just continue typing (this normally takes around 7 seconds or until you use your keyboard arrows or mouse to do something different

I know this may be a very obvious tip, but I’ve witnessed too many people taking forever to find objects by scrolling to not include this in the “Things new X++ Developers Should know” series.

Enjoy


4. Drill through to code from Info log

As part of my series on “Things new X++ Developers Should know”. I have been writing a few basic howtos for new X++ Developers.

Today’s post relates to quickly navigating to the source code from where an info log error, warning or information message is called from.  It took me a while to figure out that for many info log messsages you can simply double click on the message in the info log window and the code that called the message will be displayed for you.

E.G. If you see the normal error log icon or warning icons with a small arrow in the bottom left corner, you are normally able to double click the message to see the code behind it. These icons look like this:

InfoDrillDown2

Error Log

Infolog Info

Info Message

Warning Message

Warning Message


Simply Double click the message as below

InfoDrillDown

To be presented with the code that called it.

InfoLog5


NOTE 1: If you have your “Execute business operations in CIL” user option enabled, a lot of business logic like postings etc will not allow you to drill down.

NOTE 2: If the code calling the info message makes use of the SysInfoAction parameter, you will be taken to an alternate form specified by the developer and not the source code. (See Axaptapedia Article)

3. Drilling down to the parent type of an object in the AOT.

As part of my series on “Things new X++ Developers Should know”. I have been writing a few basic howtos for new X++ Developers.

Today’s post relates to quickly navigating to the source or parent type of an object in the AOT. This is often useful to drill through to a parent object to discover, debug or modify properties and code. The following are some examples of drill-downs you can perform

1. Open the Data Dictionary Table from a Form’s datasource
2. Open the Data Dictionary Enum used from a table field
3. Open the Extended Data Type used by a table field
4. Open the AOT Form object (or class, report etc) from a Menu-item object
5. Open the Data Dictionary Table object from a Query datasource
6. Open a parent EDT from an extended EDT
7. Open a parent class from an extending class.

Steps

1. Open the object in question e.g. a Table field.
2. Right click on the field.
3. Select “Add-ins”
4. Select Open new Window
5. Click “Open used Extended Data Type”
2015-05-08_1521

6. The parent type is now displayed in a new window. In this example the ProjId EDT is displayed
2015-05-08_1524

7. Determine Field name of control on an AX Form

As part of my series on “Things new X++ Developers Should know”. I have been writing a few basic howtos for new X++ Developers.

With some of the more complex forms in AX 2012 it can sometimes be quite tricky to navigate through the form hierarchy in the AOT to debug which table and field certain controls on your form are bound to. So today I’ll cover how to determine the Table and Field name or the name of a control directly from an AX Client form. A quick and easy way to do so is to simply use the “personalise” function in AX.

NOTE: This requires you to have system administrator privileges (which you probably have if you are a developer)

1. From any form in AX. Right click on the form control or field that you would like to diagnose.
2. Click “personalise”
Personalise_001


3. From the personalise screen you can now view the following:

Personalise_002


#1. The location in the Design node of the AOT where the control resides
#2. The name of the Control in the AOT
#3. The name of the AOT Table name that the control is bound to
#4. The name of the datasource on the form that the control is bound to (normally the same as the Table Name)
#5. The name of the field on the table that the control is bound to


2. Drilling down to the AOT from an open form

As part of my series on “Things new X++ Developers Should know”. I have been writing a few basic howtos for new X++ Developers.

Today we cover how to determine the AOT name of the current form that you are accessing and edit it directly without having to go through the tedious process of navigating/searching in the AOT. This can be very useful in increasing productivity as well as debugging functionality

1. From any form in AX right click on an control.
2. Click “Personalise”.
Personalise


3. Select the “Information” tab.
4. The AOT name of the form is visible under “Form name”.
5. Click Edit to acess the form in the AOT.
Personal_2

Note: This won’t work for forms created in code like dialogs etc..

Things new X++ Developers should know

developer-iconSince my start in X++ development over 6 years ago there are many small things that I have learnt that I wish I had known from the start. Small things that won’t necessarily help you post a stock journal from code or perform complex integration tasks, but none the less makes your day ever so much more productive. If you are a seasoned developer you will most probably already know most of these, but I thought I’d put them all down in a neat list for new guys to go through. Here are some of my favourites along with links to short articles on how to do them. (I will hopefully add some more over time).

1. Keyboard Shortcut to view properties of an AOT element: Simply Hit “Alt+Enter” on any AOT element to view its’ properties list. Much quicker than fumbling with right clicking on the mouse. (view more shortcuts)
2. Drilling down to the AOT from an open form: Instead of reverse engineering forms from menu structures or navigating in the AOT to edit a specific form, simply right click on any form, click “Personalise”, select the “Information” tab, click on the “Edit” button next to the form name. (view details)
3. Drilling down to the dictionary type of an object in the AOT. E.G. Edit enum or EDT being used by a field on a table. Navigate to an element in the AOT e.g. A enum field on a table. Right click on the element, click “add-ins”, click “Open in new Window”, click “Open used Enum” etc…. (view details)
4. Drill through to code from Info log – Quite often the info log will allow you to drill down into the code the called the error message. If you notice a small arrow on the error icon you can simply double click on the line to take you to the code. (view details)
5. Infolog code drill down does not work if code is running in CIL. As an addition to the above you will not be able to drill down to code if it is running in CIL. For DEVELOPMENT/DEBUGGING purposes only you can simply disable code from running in CIL in your User Options.
6. Run AX as an alternative user. For debugging security or processing workflow it is often needed to run AX as an alternative user. Simply press Shift and right click on the AX icon on your desktop. You can then select “Run as different user”. (view more)
7. Determine Field name from control on Form. Sometimes you need to quickly find out the database table and field that is shown on a form without navigating through the complex AOT form. Simply right click on the field, click “personalise”. Under “System Name” you will see the following: Control name, Datasource Name, Table Name and finally Field Name. (view details)
8. Locate specific AOT object without scrolling. This may be an obvious one as Windows uses this technique in many other applications. Open the AOT and expand and click on the main node of the object you are looking for e.g. Classes. Then simply type the name to navigate to the specific object. (view details)
9. Creating an Development Environment shortcutAs a developer you don’t necessarily want to login to the Dynamics AX front end whenever accessing the AX shortcut, but rather want to open a development workspace directly. To do so right click on the AX shortcut on your desktop, click properties, on the shortcut tab in the “target” field add “-development” after the path to the Ax32.exe file. (View step by step)
10. Enabling breakpoints / debugger. One of the most important tools in a developers toolbag is the debugger. There are a few items on the checklist that you should ensure before you can successfully debug code: View them here.
11. Enabling viewing of Layer and Models. In a complex AX environment it is very useful to know what model and layer an object forms part of in order to search for patches or fix yourself. You can easily enable the AOT to display these by navigating to: File -> Tools -> Options -> Development -> Application Object Tree -> Application Object layer -> Select “Show All layers” and Application Object Model -> “show on All elements”.
12. AX Layer Config files. Create AX shortcut files to allow you to easily logon to the layer of your choice. View how here. (link available soon)
13. Profiler / SQL Trace. You can easily make use SQL Tracing or profiler to see the exact SQL being executed behind the scenes. This can be very useful for debugging purposes. (link available soon)
14. Using Alt+[Up/Down] keys to reorder AOT elements. To rearrange object elements like controls on a form grid simply hold in ALT and press the Up and Down keys to rearrange its order in the parent. (view details)

Anyway thats my list for now. Please let me know of any other quick tips and tricks that you think new developers (or old) should know about!

Keep a lookout for some more detailed explainations on some of these coming up in the follow days.

For some more advanced tips, tricks and coding patterns please also checkout the knowledge base at dynamicsaxtraining.com