AX/D365 SSRS Report: “: Error 1 : Format is invalid. “

Problem: When modifying a SSRS report I received the following error at compile time. “Error 1 : Format is invalid. InvalidIdentifier \SSRS Reports\Reports\[ReportName]”

Solution: It turns out if you copy and paste expressions with functions in them, Visual studio will create an expanded version of them with the full function namespace e.g.
=Format(Fields!MyDateTimeField.Value, “dd/MM/yyyy hh:mm:ss tt”)
becomes
=Microsoft.VisualBasic.Strings.Format(Fields!MyDateTimeField.Value, “dd/MM/yyyy hh:mm:ss tt”)

Simply removing this additional namespace seems to resolve the issue.

Hope my pain helps someone!

Report not working “This report doesn’t exist just yet”

When testing a new report I encountered the following error: “We’re working on it. This report doesn’t exist just yet”

I could not locate any google help for this stupid error, so here’s the issue:

My menu item was linked to the correct controller class in its “Object” properties but the Object type I had forgotten to change to “Class” from the default SSRSReport.

Powershell/GIT – Create PackageLocalDirectory Symlinks

Its been a while since my last post, but to follow are hopefully a couple of my mental notes I need to put down into writing for future use.

Recently i had to connect a development environment to a GIT repository. I followed the following guide:

https://devblogs.microsoft.com/cse/2022/06/14/xpp-and-git/

However due to a large number of different models in the repo, it wouldve taken quite a while to create each and every folder link, so i wrote the following (draft) script. To run it, navigate to the C:\AOSService\PackagesLocalDirectory in Powershell and run the following:

Get-ChildItem –Path "C:\users\Administrator\source\repos\[FOLDER WITH MODEL FOLDERS]\"  -Directory |
Foreach-Object {    
    New-Item -ItemType SymbolicLink -Path $_.BaseName -Target $_.FullName

    Write-Host $_.BaseName

}

Note 1: This script is not bulletproof and I’m do not claim in anyway to be a Powershell expert, so if you have improvements let me know, I’d love to learn.

Note 2: I in addition to the post above, I needed to fix securities on the folders in my repo to allow the AOS service to read the models as i was receiving these errors:

AX is shutting down due to an error.
An error occurred when starting the AOS.
Exception details:
Microsoft.Dynamics.AX.InitializationException: An error occurred when starting the AOS. ---> System.UnauthorizedAccessException: Access to the path 'C:\AOSService\PackagesLocalDirectory\[MODEL FOLDER]' is denied.
   at System.IO.__Error.WinIOError(Int32 errorCode, String maybeFullPath)
   at System.IO.FileSystemEnumerableIterator`1.CommonInit()
   at System.IO.FileSystemEnumerableIterator`1..ctor(String path, String originalUserPath, String searchPattern, SearchOption searchOption, SearchResultHandler`1 resultHandler, Boolean checkHost)

Prevent AX Reports from Auto-Sending via Outlook Email

Requirement: When choosing email as the report destination in, allow the user to edit the email contents in Outlook rather than automatically sending.

A number of users have been concerned that outlook automatically sends email destination reports, rather than allowing them to first modify or verify the email, subject and addresses in a “new email” window.

Solution: To fix this you can modify the “SRSReportRunMailer.emailReport” method. Depending on your version of AX, modify the section around line 41 as below.

result = inetMailer.sendMailAttach(_emailContract.parmTo(),
                                  _emailContract.parmCc(),
                                  _emailContract.parmSubject(),
                                  _emailContract.parmBody(),
                                   true, /* Ensure dialog is shown */
                                  //original false, /* do not show dialog*/
                                  _attachmentPath);


Allow non editable table fields to be modified via AIF.

Requirement: Allow requests made via AIF to modify fields with the table field property “AllowEdit” set to NO to be modified. By default if you modify a field in a service call that is non editable no errors occur but the field is not updated.

Solution: On your AXD service contract class, right click on the class , click “Override method” choose method “initFieldAccessOverrides” to override. Append the following line to the method

this.overRideFieldAccess(tableNum([YourTable]), fieldNum([YourTable], [YourField]), AxdFieldAccess::AllowEdit, NoYes::Yes);

Note: This can also be used to override the “editOnCreate” property of a table field for AIF usage.

Batch Job Updates – The Corresponding AOS Validation Failed

I’ve had it a number of times when trying to update parameters on batch job tasks that I’ve received the cryptic message “Cannot edit a record in Batch transactions (Batch). The corresponding AOS validation failed.” Due to laziness or business I’ve always dismissed the problem and found a work around, but never fully tried to understand why this message occurs.

Screen Shot 2018-01-31 at 7.47.23 AM

I’ve finally had the opportunity to drill into it and decided to share what I found.
Firstly: The message is generated because of the value “false” being returned from the overwritten method “aosValidateUpdate” on table “Batch”, this explains the text of the message “AOS validation failed”, but not the business logic reasons. Drilling into this method one can see the following business logic for allowing updates of batch tasks

1. The user doing the update must either be the person who created the record (createdBy field) or a person with access to the Display MenuItem  “BatchJob” (see Batch->IsBatchOperator). (This does work for administrators who don’t have explicit access).
2. Batch tasks may not change the company, dataPartition or batchJobId. (This is unlikely to happen as they are disable from forms anyway)
3. If the user doing the update is NOT the person who created the job then the parameters and Class of the task cannot be changed – this is the primary reason why we were experiencing the issue.

Notes: I’m not sure why the rule around changing the parameters exists, but it does, so if you want to change this then you would need to either login as the creator and change the parameters, or modify via SQL the batch task to run under your user in the case of historical batch jobs where the user does not exist.


AX User 101 – Tips and Tricks for Using AX

A few months ago I wrote a series of posts on things I wish somebody had told me as an X++ developer right at the beginning of my explorations into the world of Dynamics AX. Today I want to start on a new list, one prompted by years of looking over the shoulders of users and realizing that many of the very basic navigation tools that I know and take for granted are often not taught to or effectively utilized by users.

For example I’ve seen way too many users copying field data on one form E.G. Employee Id on Purchase requisition and then navigating to the Employee form to go and search for it instead of simply right clicking and then clicking view details.

The target audience of this series is not seasoned users of AX (although you may benefit too) but rather new users wanting a quick centralized list of tips and tricks that can be used to make your usage of Dynamics AX that much more efficient. Where possible I have will try to link the tips to pre-existing blog posts from other experts rather than than create yet more of the same AX posts for the web.

Navigation (Using the interface).

  1. Drilling down to parent/source records.
  2. Viewing all available fields for a record.
  3. Running multiple workspaces.
  4. Quick navigation through records from edit form.
  5. Reporting
    1. Saving reports to PDF
    2. Saving reports to Excel
    3. Emailing reports via Outlook.
    4. Auto-Reports

Working With Data.

  1. Filtering
    1. View Filter Grid – Ctrl+G
    2. Quick Filter by value.
    3. Advanced filter operators
    4. Save Queries/Filters
    5. Quick filters on lookups
  2. Interacting with Excel
    1. Export to Excel – Ctrl+T
    2. Copy & Paste to Excel
    3. Export subset of data
  3. Alerts
    1. Change based alerts
    2. Due date alerts.

Customizing your experience.

  1. Adding/Hiding fields on your form.
  2. Saving form customisations
  3. Retrieving form customisations from alternate users.
  4. Favorites Menu.
  5. Creating custom favourites with filters.
  6. Useful default user options
    1. Change default company
    2. Always open forms in Edit mode.
    3. Default filter by grid

References / Additional Reading:

  • http://atinkerersnotebook.com/2015/01/24/creating-one-master-menu-to-get-just-what-you-need/
  • http://blog.ignify.com/2015/07/07/personalization-with-microsoft-dynamics-ax-five-ways-to-streamline-your-user-interface/

AX DB Restore Scripts – Full Script

Just over a month ago I embarked on a series of posts on SQL scripts that I use when restoring Dynamics AX databases from one environment to another. We have covered topics including server setups, general configurations as well as data cleans to get your new environment up and smoothly running as quickly as possible. We are now at the end of the series and I trust it has been helpful to you in structuring your scripts.

I’d just like to remind you that these posts and scripts are not meant to be used as is but rather to serve as a guide to adapt for your specific scenario and to prompt your own thinking as to what you will need.

That said you can download my templated script here or view it below (download)

Declare @AOS varchar(30) = '[AOSID]' --must be in the format '01@SEVERNAME'
---Reporting Services---
Declare @REPORTINSTANCE varchar(50) = 'AX'
Declare @REPORTMANAGERURL varchar(100) = 'http://[DESTINATIONSERVERNAME]/Reports_AX'
Declare @REPORTSERVERURL varchar(100) = 'http://[DESTINATIONSERVERNAME]/ReportServer_AX'
Declare @REPORTCONFIGURATIONID varchar(100) = '[UNIQUECONFIGID]'
Declare @REPORTSERVERID varchar(15) = '[DESTINATIONSERVERNAME]'
Declare @REPORTFOLDER varchar(20) = 'DynamicsAX'
Declare @REPORTDESCRIPTION varchar(30) = 'Dev SSRS';

---SSAS Services---
Declare @SSASSERVERNAME varchar(20) = '[YOURSERVERNAME]\AX'
Declare @SSASDESCRIPTION varchar(30) = 'Dev SSAS'; -- Description of the server configuration

---BC Proxy Details ---
Declare @BCPSID varchar(50) = '[BCPROXY_SID]'
Declare @BCPDOMAIN varchar(50) = '[yourdomain]'
Declare @BCPALIAS varchar(50) = '[bcproxyalias]'
---Service Accounts ---
Declare @WFEXECUTIONACCOUNT varchar(20) = 'wfexc'
Declare @PROJSYNCACCOUNT varchar(20) = 'syncex'
---Help Server URL---
Declare @helpserver varchar(200) = 'http://[YOURSERVER]/DynamicsAX6HelpServer/HelpService.svc'

---Outgoing Email Settings---
Declare @SMTP_SERVER varchar(100) = 'smtp.mydomain.com' --Your SMTP Server
Declare @SMTP_PORT int = 25
---DMF Folder Settings ---
Declare @DMFFolder varchar(100) = '\\[YOUR FILE SERVER]\AX import\ '

---Email Template Settings---
Declare @EMAIL_TEMPLATE_NAME varchar(50) = 'Dynamics AX Workflow QA - TESTING'
Declare @EMAIL_TEMPLATE_ADDRESS varchar(50) = 'workflowqa@mydomain.com'
---Email Address Clearing Settings---
DECLARE @ExclUserTable TABLE (id varchar(10))
insert into @ExclUserTable values ('userid1'), ('userid2')

--List of users separated by | to keep enabled, while disabling all others 
Declare @ENABLE_USERS NVarchar(max) = '|Admin|TIM|'
--List of users separated by | to disable, while keeping all the rest enabled all others  
--Declare @DISABLE_USERS NVarchar(max) = '|BOB|JANE|'

--*****BEGIN UPDATES*******---

---Update AOS Config---
delete from SYSSERVERCONFIG where RecId not in (select min(recId) from SYSSERVERCONFIG)
update SYSSERVERCONFIG set serverid=@AOS, ENABLEBATCH=1 
	where serverid != @AOS -- Optional if you want to see the "affected row count" after execution.

---Update Batch Servers---
delete from BATCHSERVERGROUP where RecId not in (select min(recId) from BATCHSERVERGROUP group by GROUPID)
update BATCHSERVERGROUP set SERVERID=@AOS 
	where serverid != @AOS -- Optional to see "affected row count"
update batchjob set batchjob.status=4 where batchjob.CAPTION = '[BATCHJOBNAME]'
update batch set batch.STATUS=4 from batch inner join BATCHJOB on BATCHJOBID=BATCHJOB.RECID AND batchjob.CAPTION = '[BATCHJOBNAME]'

---Update Reporting Services---
delete from SRSSERVERS where RecId not in (select min(recId) from SRSSERVERS)
update SRSSERVERS set 
    SERVERID=@REPORTSERVERID, 
    SERVERURL=@REPORTSERVERURL, 
    AXAPTAREPORTFOLDER=@REPORTFOLDER,
    REPORTMANAGERURL=@REPORTMANAGERURL, 
    SERVERINSTANCE=@REPORTINSTANCE, 
    AOSID=@AOS,
    CONFIGURATIONID=@REPORTCONFIGURATIONID, 
    DESCRIPTION=@REPORTDESCRIPTION
where SERVERID != @REPORTSERVERID -- Optional if you want to see the "affected row count" after execution.

---Update SSAS Services---
delete from BIAnalysisServer where RecId not in (select min(recId) from BIAnalysisServer)
update BIAnalysisServer set 
    SERVERNAME=@SSASSERVERNAME, 
    DESCRIPTION=@SSASDESCRIPTION,
	ISDEFAULT = 1
WHERE SERVERNAME <> @SSASSERVERNAME -- Optional where clause if you want to see the "affected rows

---Set BCPRoxy Account---
update SYSBCPROXYUSERACCOUNT set SID=@BCPSID, NETWORKDOMAIN=@BCPDOMAIN, NETWORKALIAS= @BCPALIAS
where NETWORKALIAS != @BCPALIAS --optional to display affected rows.
---Set WF Execution Account---
update SYSWORKFLOWPARAMETERS set EXECUTIONUSERID=@WFEXECUTIONACCOUNT where EXECUTIONUSERID != @WFEXECUTIONACCOUNT
---Set Proj Sync Account---
update SYNCPARAMETERS set SYNCSERVICEUSER=@PROJSYNCACCOUNT where SyncServiceUser!= @PROJSYNCACCOUNT
---Set help server URL---
update SYSGLOBALCONFIGURATION set value=@helpserver where name='HelpServerLocation' and value != @helpserver

---Update Email Parameters---
Update SysEmailParameters set SMTPRELAYSERVERNAME = @SMTP_SERVER, @SMTP_PORT=@SMTP_PORT
---Update DMF Settings---
update DMFParameters set SHAREDFOLDERPATH = @DMFFolder 
where SHAREDFOLDERPATH != @DMFFolder --Optional to see affected rows

---Set BCPRoxy Account---
update SYSBCPROXYUSERACCOUNT set SID=@BCPSID, NETWORKDOMAIN=@BCPDOMAIN, NETWORKALIAS= @BCPALIAS
where NETWORKALIAS != @BCPALIAS --optional to display affected rows.
---Set WF Execution Account---
update SYSWORKFLOWPARAMETERS set EXECUTIONUSERID=@WFEXECUTIONACCOUNT where EXECUTIONUSERID != @WFEXECUTIONACCOUNT
---Set Proj Sync Account---
update SYNCPARAMETERS set SYNCSERVICEUSER=@PROJSYNCACCOUNT where SyncServiceUser!= @PROJSYNCACCOUNT
---Set help server URL---
update SYSGLOBALCONFIGURATION set value=@helpserver where name='HelpServerLocation' and value != @helpserver

---Update Email Templates---
update SYSEMAILTABLE set SENDERADDR = @EMAIL_TEMPLATE_ADDRESS, SENDERNAME = @EMAIL_TEMPLATE_NAME where SENDERADDR!=@EMAIL_TEMPLATE_ADDRESS OR  SENDERNAME!=@EMAIL_TEMPLATE_NAME;
update SYSEMAILSYSTEMTABLE set SENDERADDR = @EMAIL_TEMPLATE_ADDRESS, SENDERNAME = @EMAIL_TEMPLATE_NAME where SENDERADDR!=@EMAIL_TEMPLATE_ADDRESS OR  SENDERNAME!=@EMAIL_TEMPLATE_NAME;
---Update User Email Addresses---
update sysuserinfo set sysuserinfo.EMAIL = '' where sysuserInfo.ID not in (select id from @ExclUserTable)

---Disable all users except for a specific set---
update userinfo set userinfo.enable=0 where  CharIndex('|'+ cast(ID as varchar) + '|' , @ENABLE_USERS) = 0
---Disable specific users---
---update userinfo set userinfo.enable=0 where  CharIndex('|'+ cast(ID as varchar) + '|' , @DISABLE_USERS) > 0

--Clean up server sessions
delete from SYSSERVERSESSIONS
--Clean up client sessions.
delete from SYSCLIENTSESSIONS

View Previous – AX DB Restore Scripts #8 – Disable users

Back to List

AX DB Restore Scripts #8 – Disable users

A few weeks ago I embarked on a series of posts on SQL scripts I use when restoring Dynamics AX databases from one environment to another. We have covered a variety of topics including various configuration and setting changes to Dynamics AX. This post will be the last in the set of “data cleanup scripts” designed to help scrub your data for use in a development or testing environment.

Disabling users.

Quite often companies or partners will require access to development environments to be restricted to a very select group of users that are aware of what to test and are also careful enough to work methodically in the correct environments (i.e. not trying to to real work in the wrong environment or test work in production). To ensure all of the above one could follow a few paths.

  1. Only provide a shortcut/configuration to users who require it.
  2. Color code your environments so that they immediately recognizable.
  3. Add a startup message to your AX environment to warn users what environment they are logged into.

All of these solutions do not physically stop users from accessing the alternate environment.  So if you need an additional security mechanism, simply disable the users either manually in AX after doing a restore or disable then along with the SQL scripts we have been building up over the past few weeks.

To disable users in AX navigate to “System Administration -> Common -> Users -> Users. Double click on the user in question, click “edit”, uncheck the “enabled” button.DisableUser

The accomplish the same in a SQL script you can do the following. I have parameterised the SQL for easier reuse or adjustment.

--List of users separated by | to keep enabled, while disabling all others 
Declare @ENABLE_USERS NVarchar(max) = '|Admin|TIM|'

update userinfo set userinfo.enable=0 where  CharIndex('|'+ cast(ID as varchar) + '|' , @ENABLE_USERS) = 0


--List of users separated by | to disable, while keeping all the rest enabled all others  
Declare @DISABLE_USERS NVarchar(max) = '|BOB|JANE|'

update userinfo set userinfo.enable=0 where  CharIndex('|'+ cast(ID as varchar) + '|' , @DISABLE_USERS) > 0

Note 1: Parameterising a list can be tricky in TSQL, so the above trick is what i found easiest.
Note 2: You will need to decide whether the list of users provided is inclusive (i.e. provide the list of all the users you WANT to disable) or exclusive (i.e. disable all users except for a small subset). I have provided both options, but would recommend the exclusive approach as it is more likely to give you safely give you what you expect.

I hope this assists you and will be useful in your management of your AX environments. Keep an eye out for new posts in this series!

View Previous – AX DB Restore Scripts #7 – Setting Email Templates and User Email Addresses

Back to List

AX DB Restore Scripts #7 – Setting Email Templates and User Email Addresses

In my series of posts on SQL scripts I use when restoring Dynamics AX databases from one environment to another, we have so far covered various configuration and setting changes to Dynamics AX. Today I will move on to some suggested data changes that you may wish to consider making when doing database restores. These changes won’t affect the functioning of AX, but may prevent some awkward or confusing situations like clients or user’s receiving emails etc..

These data cleanup scripts are really meant as guidelines to help you in creating your own scripts, rather than a comprehensive set of “must-do” scripts.

The two changes for today are as follows

  1. Setting your email templates to clearly indicate that they originate from a testing system. It may be perfectly legitimate for users to receive emails from your testing or development environments, e.g. for testing workflows, however it is very helpful for the users to clearly see that they are viewing test data rather than production data. So setting the senders name and address to indicate “Development” will assist.
    Email templates are found under: Organisation administration -> Setup -> Email templates
    Email_Templates
    2. Setting user email addresses. We obviously don’t want to send emails to users who have no interest in our development systems so one may, depending on your needs, want to do one of the following.

    1. Clear all user’s email addresses, except for a specific subset.
    2. Set some or all user’s email addresses to a single address (e.g. You want emails to still be generated to see that they are working, but you would like to see the contents of them yourself and not expose the user to the test data)

These settings can be found under System Administration -> Users -> Options (ribbon button) ->  Email
Email_Address

The following SQL code will accomplish the above. I have parameterised the SQL for easier reuse or adjustment.

---Email Template Settings---Declare @WFAPPROVER_ADD varchar(50) = 'workflowqa@norplats.co.za'
Declare @EMAIL_TEMPLATE_NAME varchar(50) = 'Dynamics AX - DEVELOPMENT'
Declare @EMAIL_TEMPLATE_ADDRESS varchar(50) = 'dev@mydomain.com'

---Email Address Clearing Settings---
DECLARE @ExclUserTable TABLE (id varchar(10))
insert into @ExclUserTable values ('userid1'), ('userid2')

---Update Email Templates---
update SYSEMAILTABLE set SENDERADDR = @EMAIL_TEMPLATE_ADDRESS, SENDERNAME = @EMAIL_TEMPLATE_NAME where SENDERADDR!=@EMAIL_TEMPLATE_ADDRESS OR  SENDERNAME!=@EMAIL_TEMPLATE_NAME;
update SYSEMAILSYSTEMTABLE set SENDERADDR = @EMAIL_TEMPLATE_ADDRESS, SENDERNAME = @EMAIL_TEMPLATE_NAME where SENDERADDR!=@EMAIL_TEMPLATE_ADDRESS OR  SENDERNAME!=@EMAIL_TEMPLATE_NAME;
---Update User Email Addresses---
update sysuserinfo set sysuserinfo.EMAIL = '' where sysuserInfo.ID not in (select id from @ExclUserTable)

Note, the above example clears all user email addresses except for a specific set, you could easily adjust this to set them all to a specific address as follows:

update sysuserinfo set sysuserinfo.EMAIL = 'youraddress@mydomain.com'


I hope this assists you and will be useful in your management of your AX environments. Keep an eye out for new posts in this series!

View Previous – AX DB Restore Scripts #6 – SMTP Server and DMF Folder

View Next – AX DB Restore Scripts #8 – Disable users

Back to List

AX DB Restore Scripts #6 – SMTP Server and DMF Folder

Recently I started creating a list and a series of posts on SQL scripts I use when restoring Dynamics AX databases from one environment to another, typically from production to QA or development.

We have so far discussed a number of configurations that must be changed for the new system to operate effectively and starting yesterday we moved onto exploring more optional configurations.

Today we will cover two of these items namely re-configuring the outgoing SMTP server in AX and configuring the settings for the DMF working folder.

Note: In my experience the SMTP server will most likely not change between a production and development server, but you may need to reconfigure it if moving to a new domain etc. Similarly it will work to use the same DMF shared folder between PROD and DEV, however I would recommend changing this to keep the data 100% separate.

These two configurations are located in the Dynamics AX 2012 client under the following paths.
1. SMTP Server, accessed via System Administration -> Setup -> System -> E-mail parameters.EmailServer

2. Data import, export framework shared working directory. Accessed via “Data import export framework -> Setup -> Data import export framework parameters”
DMF

To update these 2 settings above we need to do the following:

1. Update the SysEmailParameters table to update the SMTP server name (and additional login parameters)
2. Update the DMFParameters table to reflect the new shared folder path.

The following SQL code will accomplish the above. I have parameterised the SQL for easier reuse or adjustment.

---Outgoing Email Settings---
Declare @SMTP_SERVER varchar(100) = 'smtp.mydomain.com' --Your SMTP Server
Declare @SMTP_PORT int = 25

---DMF Folder Settings ---
Declare @DMFFolder varchar(100) = '\\[YOUR FILE SERVER]\AX import\'

---Update Email Parameters---
Update SysEmailParameters set SMTPRELAYSERVERNAME = @SMTP_SERVER, @SMTP_PORT=@SMTP_PORT
---Update DMF Settings---
update DMFParameters set SHAREDFOLDERPATH = @DMFFolder 
where SHAREDFOLDERPATH != @DMFFolder --Optional to see affected rows

I hope this assists you and will be useful in your management of your AX environments.

View next – AX DB Restore Scripts #7 – Setting Email Templates and User Email Addresses

View Previous – AX DB Restore Scripts #5 – Configure Service Accounts and Help Server

Back to List

AX DB Restore Scripts #5 – Configure Service Accounts and Help Server

Last week I embarked on a series of posts on DB restore scripts for Dynamics AX by creating a list of items in your AX database that need to be updated/reconfigured when restoring a database from a production environment to a development or QA one.

So far we have covered the majority of the most critical issues to fix when doing a DB restore, so from today on most of the scripts are basically optional. They are optional for one of the following reasons: 1. It may be common to have the same configuration in both live and dev, yet in some circumstances they may differ e.g. Business connector may remain the same if you are restoring from live to dev, but not from live to a demo VPC.
2. The data is correct but for safety or security you may want to manipulate it for a development environment. E.G. Changing all email templates to clearly indicate the source is from a dev system.

Today we will cover two topics namely re-configuring the service accounts in AX and configuring the AX help server URL.

In the Dynamics AX 2012 client, the configurations that we are going to look at are:
1. System Service Accounts, accessed via System Administration -> Setup -> System -> System service Accounts

ServiceAccounts

2. Batch Jobs, accessed via System Administration -> Setup -> System -> Help system parameters
Helpserver

To update the settings above we need to do the following:

1. Update the SYSBCPROXYUSERACCOUNT table to reflect the business connector user’s SID, networkdomain and network alias. For this step you will need to find out the SID of the business connector either by setting it manually the first time and then running select SID from SYSBCPROXYUSERACCOUNT where NETWORKDOMAIN='[yourdomain]’ and NETWORKALIAS='[yourbcuseralias]’ or follow one of the suggestions over here http://blogs.msdn.com/b/gaurav/archive/2014/06/03/get-sid-of-the-object-registry-wmic-powershell.aspx
2. Update the SYSWORKFLOWPARAMETERS table to reflect the userId of the workflow execution account.
3. Update the SYNCPARAMETERS table to reflect the userId of the Microsoft Project server synchronization service account.
4. Update SYSGLOBALCONFIGURATION to reflect new help server URL if necessary.

Notes:
1. If you are wanting to use an Alias/Network domain combination for either of the two execution accounts, I would recommend setting them manually in AX as they create users and permissions automatically when you do this. 
2. The above script assumes that execution accounts you are setting exist in the new system and have the necessary permissions.

The following SQL code will accomplish the above. I have parameterised the SQL for easier reuse or adjustment.

---BC Proxy Details ---
Declare @BCPSID varchar(50) = '[BCPROXY_SID]'
Declare @BCPDOMAIN varchar(50) = '[yourdomain]'
Declare @BCPALIAS varchar(50) = '[bcproxyalias]'
---Service Accounts ---
Declare @WFEXECUTIONACCOUNT varchar(20) = 'wfexc'
Declare @PROJSYNCACCOUNT varchar(20) = 'syncex'
---Help Server URL---
Declare @helpserver varchar(200) = 'http://[YOURSERVER]/DynamicsAX6HelpServer/HelpService.svc'

---Set BCPRoxy Account---
update SYSBCPROXYUSERACCOUNT set SID=@BCPSID, NETWORKDOMAIN=@BCPDOMAIN, NETWORKALIAS= @BCPALIAS
where NETWORKALIAS != @BCPALIAS --optional to display affected rows.
---Set WF Execution Account---
update SYSWORKFLOWPARAMETERS set EXECUTIONUSERID=@WFEXECUTIONACCOUNT where EXECUTIONUSERID != @WFEXECUTIONACCOUNT
---Set Proj Sync Account---
update SYNCPARAMETERS set SYNCSERVICEUSER=@PROJSYNCACCOUNT where SyncServiceUser!= @PROJSYNCACCOUNT
---Set help server URL---
update SYSGLOBALCONFIGURATION set value=@helpserver where name='HelpServerLocation' and value != @helpserver

I hope this assists you and will be useful in your management of your AX environments.

View Next – AX DB Restore Scripts #6 – SMTP Server and DMF Folder

View Previous – AX DB Restore Scripts #4 – Reconfigure batch jobs

Back to List

AX DB Restore Scripts #3 – Configure AX servers and batch servers

Earlier this week I embarked on a series of posts on DB restore scripts for Dynamics AX by providing a list of data entities in your AX database that need to be updated when restoring a database from a production environment to a development or QA one.

Today I will be drilling into how to reset/configure your AX AOS and batch AOS configurations via DB scripts. These scripts are necessary especially for the SSRS script and for the batch server update script (available soon) as these rely on a correct AOS configuration.

Note: Under normal circumstances a new configuration for your AOS will automatically be created if it does not exist when the AOS starts up after a restore, however all your other configs like batch jobs, SSRS settings etc won’t be pointing to it, but rather the old settings that are not cleared. Thus I prefer to fix this in my script.

In the Dynamics AX 2012 client these configurations are located under System Administration -> Setup -> System -> Server Configuration

AOS_servers

Depending on the configuration of your source system (e.g. Production) you may have multiple AOSs setup here and typically your destination may only have a single AOS configuration therefore your script would need to do the following:

1. Remove all but one of the AOS configurations
2. Update the server details of the remaining configuration
3. Enable the remaining server as the “batch” server.

The following SQL code will accomplish the above. I have parameterised the SQL for easier reuse or adjustment.

 --Reuse the parameter declared for the SSRS update script
Declare @AOS varchar(30) =  '[AOSID]' -- Must be in the format '01@SEVERNAME'

-- Clear out all but one server config.
delete from SYSSERVERCONFIG where RecId not in (select min(recId) from SYSSERVERCONFIG)
-- Update the remaining one to point to your current AOS and enable it for batch processing
update SYSSERVERCONFIG set serverid=@AOS, ENABLEBATCH=1 
where serverid != @AOS -- Optional if you want to see the "affected row count" after execution.

Note: These changes assume everything is setup correctly on the SSAS server itself.

2015-09-03_0751

View Next – AX DB Restore Scripts #4 – Reconfigure batch jobs

View Previous – AX DB Restore Scripts #2 – SSAS Servers

Back to List

AX DB Restore Scripts #2 – SSAS Servers

Recently I started a series of posts on DB restore scripts for Dynamics AX by providing a list of data entities in your AX database that may need to be updated when restoring from one environment to another, in particular a production DB to a development or QA environment.

Today I will be drilling into how to reset the SSAS (SQL Server analysis services) configurations via DB scripts.

In the Dynamics AX 2012 client these configurations are located under System Administration -> Setup -> Business Intelligence -> Analysis Services -> Analysis Servers.

Analysis

Depending on the configuration of your source system (e.g. Production) you may have multiple servers setup here and typically your destination would only have a single server (Development) therefore your script would need to do the following:

1. Remove all but one of the SSAS configurations
2. Update the server details of the remaining configuration

The following SQL code will accomplish the above. I have parameterised the SQL for easier reuse or adjustment.

Declare @SSASSERVERNAME varchar(20) = '[YOURSERVERNAME]\AX'
Declare @SSASDESCRIPTION varchar(30) = 'Dev SSAS'; -- Description of the server configuration

delete from BIAnalysisServer where RecId not in (select min(recId) from BIAnalysisServer)
update BIAnalysisServer set 
    SERVERNAME=@SSASSERVERNAME, 
    DESCRIPTION=@SSASDESCRIPTION,
	ISDEFAULT = 1
WHERE SERVERNAME <> @SSASSERVERNAME -- Optional where clause if you want to see the "affected rows

Note: These changes assume everything is setup correctly on the SSAS server itself.

2015-09-03_0751

View Next – AX DB Restore Scripts #3 – Configure AX servers and batch servers

View Previous – AX DB Restore Scripts #1 – SSRS Servers

Back to List

AX DB Restore Scripts #1 – SSRS Servers

Yesterday I started a series of posts on DB restore scripts for Dynamics AX by providing a list of data entities in your AX database that should be updated when restoring from one environment to another.

Today I will start drilling into the details of each of these items starting with SSRS (SQL Server reporting services) configurations.

In the Dynamics AX 2012 client these configurations are located under System Administration -> Setup -> Business Intelligence -> Reporting Services -> Report Servers.

SSRS1

Depending on the configuration of your source system (e.g. Production) you may have multiple servers setup here and typically your destination would only have a single server (Development) therefore your script would need to do the following

1. Remove all but one of the SSRS configurations
2. Update the remaining one to be default and update the relevant data fields.

The following SQL code will accomplish the above. I have parameterised the SQL for easier reuse or adjustment.


Declare @AOS varchar(30) = '[AOSID]' --must be in the format '01@SEVERNAME'
Declare @REPORTINSTANCE varchar(50) = 'AX'
Declare @REPORTMANAGERURL varchar(100) = 'http://[DESTINATIONSERVERNAME]/Reports_AX'
Declare @REPORTSERVERURL varchar(100) = 'http://[DESTINATIONSERVERNAME]/ReportServer_AX'
Declare @REPORTCONFIGURATIONID varchar(100) = '[UNIQUECONFIGID]'
Declare @REPORTSERVERID varchar(15) = '[DESTINATIONSERVERNAME]'
Declare @REPORTFOLDER varchar(20) = 'DynamicsAX'
Declare @REPORTDESCRIPTION varchar(30) = 'Dev SSRS';

delete from SRSSERVERS where RecId not in (select min(recId) from SRSSERVERS)
update SRSSERVERS set 
    SERVERID=@REPORTSERVERID, 
    SERVERURL=@REPORTSERVERURL, 
    AXAPTAREPORTFOLDER=@REPORTFOLDER,
    REPORTMANAGERURL=@REPORTMANAGERURL, 
    SERVERINSTANCE=@REPORTINSTANCE, 
    AOSID=@AOS,
    CONFIGURATIONID=@REPORTCONFIGURATIONID, 
    DESCRIPTION=@REPORTDESCRIPTION
where SERVERID != @REPORTSERVERID -- Optional if you want to see the "affected row count" after execution.

Note: These changes assume everything is setup correctly on the SSRS side.

View next – AX DB Restore Scripts #2 – SSAS Servers

Back to List

AX Database Restore Scripts (List)


sqlserver (1)
A  common task in the administration of a Dynamics AX installation is restoring databases from a live application to a development environment or quality assurance (QA) environment. However when doing so one needs to be very careful to re-configure the database so that it behaves correctly in its new context. For example you would need to re-configure your SSRS servers to point to the correct DEV/QA SSRS instance. Many of these changes can be done via the front-end, but it is very useful to script these in SQL so that nothing is missed and alot of effort is saved.

microsoft-dynamics-ax-iconThe following post aims to list as many of the potential data items that need to be changed when doing a DB restore. I will in the following days be posting the relevant SQL alongside the front-end equivalent and ultimately a full DB restore script that you can use when doing such a restore. Some of these may need to be adapted for your specific configurations and you may need to add your own based on customization etc.

Infrastructure setups

  • SSRS Servers – Re-point or recreate your SSRS (SQL Server Reporting services) instances (View Details)
  • SSAS Servers – Re-point or recreate your SSAS (SQL Server Analysis services) instances (View Details)
  • Configure AX AOSs and batch AOSs – Live environments may typically have multiple AOS’ and batch servers. Cleaning up and reconfiguring these references will assist in getting new batch jobs and SSRS setups up and running. (View Details)
  • Batch Jobs/Batch Groups (View Details)
    • Reconfigure batch jobs and batch groups to use the new server configurations as soon as the AOS is started up (e.g. Workflow processing)
    • Disable certain critical batch jobs – This is especially important if there are batch jobs that should NOT run in a DEV/QA environment. E.G. Automatic placement of orders etc… These jobs should typically never be run outside of live so we want to disable them before the AOS even starts up.
  • Service accounts (Optional) Reset your AX service accounts (workflow execution and business connector proxy) if live and DEV/QA differ. (View Details)
  • Help server(Optional) Re-point your help server URL if necessary if live and DEV/QA differ. (View Details)
  • Reset outgoing email server (Optional) if live and DEV/QA differ. (View Details)
  • Reset Data Migration Framework’s shared folder (View Details)
  • Enterprise portal websites – Re-point your enterprise portal website urls to the DEV/QA instances.

Data safe guards (Optional)

  • Reset all email templates to have a sender name and address that clearly shows that they originate from a DEV/QA system. (View Details)
  • Reset Customer/Vendor/User email addresses – We may not want to inadvertently send out mails to clients, vendors or users while performing tests. These may include alert or workflow emails. (View Details)
  • Disable users – You may require that only certain users have access to DEV/QA databases for testing, scripting the disabling of the users in bulk will help prevent the wrong people from accessing the environment and save you having to do this manually. (View Details)
  • Clean up sensitive data if needed – E.G. Bank accounts, credit cards etc.
  • Set user status bar options – It is sometimes useful to set your users status bar options in DEV/QA so that you can easily identify critical bits of information relating to their sessions. (View Details)

Clean Ups

  • Clean up SYSServerSessions
  • Clean up SYSClientSessions

Role Centers / Analysis Services: Report Server (AX) cannot load the AXADOMD extension.

Let me say at the outset that I am very new to Dynamics AX role centers and analysis services and really have a lot to learn. However I thought I would share the following problem with setting up role centers and the associated solution that I found.

Problem description: After installing role centers on AX2012 RTM CU 3 with SQL Server 2012 the following error is displayed “An attempt has been made to use a data extension ‘AXADOMD’ that is either not registered for this report server or is not supported in this edition of Reporting Services. (rsDataExtensionNotFound)” 

2015-08-19_1410


The Event log on the SSRS machine says the following: Role Centers / Analysis Services: Report Server (AX) cannot load the AXADOMD extension.


Problem resolution / investigation: After chasing my tail on this one for quite a while (including multiple re-installation etc) trying to figure out why the “AXADOMD” SSRS datasource extension was not installed I discovered that the problem did not lie with “AXADOMD” being missing but rather it might be having issues when it was loading.

Looking at the SSRS log files (C:\Program Files\Microsoft SQL Server\MSRS11.AX\Reporting Services\LogFiles) I discovered the following message:

ERROR: Exception caught instantiating AXADOMD report server extension: System.Reflection.TargetInvocationException: Exception has been thrown by the target of an invocation. —> System.IO.FileNotFoundException: Could not load file or assembly ‘Microsoft.AnalysisServices.AdomdClient, Version=10.0.0.0, Culture=neutral, PublicKeyToken=89845dcd8080cc91’ or one of its dependencies. The system cannot find the file specified.
File name: ‘Microsoft.AnalysisServices.AdomdClient, Version=10.0.0.0, Culture=neutral, PublicKeyToken=89845dcd8080cc91’
at Microsoft.Dynamics.Framework.Reports.AxAdomdConnection..ctor()

This lead me to think something might be wrong with the Microsoft.AnalysisServices.AdomdClient itself despite the AX installation validation showing up that it was installed already.

Paying a quick visit to C:\Windows\Assembly revealed that only AdomdClient version 11.0.0.0 was installed

2015-08-20_1433

The simple solution to this issue was to install the 10.0.0.0 client from http://www.microsoft.com/en-za/download/details.aspx?id=23089 after which SSRS no longer complained.

2015-08-20_1431

I hope this saves somebody some of the hassle and time that I have spent on figuring this one out.


Workflow – Manual Decisions

Recently a question was asked on the Dynamics AX community forums about the reason for and the use of manual decisions in Workflow. (see original thread)

Basically manual decisions allow you as a implementation consultant at configuration time to define a question for a user to answer with two outcomes (answers) that can be used to change the logical process flow of the workflow.

Normally in my experience with workflow, processes tend to not rely on a user’s choice to define the flow, but rather on a pre-decided flow and set of rules that can be catered for by automatic decisions (conditional statements), assignment etc. However there may, from time to time, be choices that are simply too fuzzy or complex for system to handle and we can therefore delegate the decision to a human user to make. For example: We may want a purchase requisition to go through an RFQ cycle if a senior manager thinks that the amount “looks” too much, or that he thinks there “may be” preferential treatment of a selected vendor. There is no conditional statements in AX that can cater for these subjective scenarios. So we can simple ask a user using a manual decision.

So here is how we setup a manual decision.

Configuration

1. Create a new workflow configuration of your choice and fill in all the basic details. E.G. Purchase Requisition review.
2. Drag the “Manual decision” control from the “Flow controls” onto your workflow configuration.

Manual_Decision_13. Select the newly created Manual decision and click the properties Icon in ribbon bar.
4. Provide a name for the element so that it makes sense in your configuration.
5. In the “Workitem Subject” field pose a question to the user. E.G. Does this requisition require a Review / RFQ?
6. Provide a description with more details in the “Work item instructions”.
Manual_Decision_2
7. Select the “Outcomes” tab (under Basic settings) and enter the two answers for the user. E.G. “Review Document” and “Do not review”
8. Select the assignment tab and choose who to pose the question to. (beyond the scope of this blog)
9. Click close.
10. On your workflow diagram create the relevant elements such as  requisition review and approval nodes (beyond the scope of this blog)
Manual_Decision_3

11. Connect up your Manual decision
11.1 Connect an incoming flow to your decision e.g. From the start element (or from any other workflow element.
11.2 Connect (from the left of your decision) the Outcome one node to the element that your want to process should the user select what you defined as Outcome one. E.G. In our example Outcome 1 was to review document, so we connect outcome 1 to the review element. Hint: Hover over the decision to see the handle to drag the process flow
11.3 Repeat 11.2 for outcome 2.
Manual_Decision_4

12. Save and close your workflow. (ensure you select the “activate new version” option) when prompted

Test your workflow.

1. Create your document and submit it into workflow.
2. The user you selected in step 8 above should (after workflow has processed for a minute or two) see the following screen with our question and two outputs.

Manual_Decision_5


3. The user can now select an option and workflow will be redirected as needed.


I hope this is helpful in understanding Manual decisions in Workflow in Dynamics AX.

Happy Daxing

Free: AN INTRODUCTION TO DYNAMICS AX 2012 (Dynamics AX Companion Guides)

2015-07-24_1435Its not really my habit in my blog to re-post or re-blog other users content, but rather to write up my own findings as I explore Dynamics AX. However this post is a bit of a worthy exception.

If you have been in AX for an period of time you have most likely heard of Murray Fife and his very practical Companion guides to Dynamics AX. Right now you can download his “AN INTRODUCTION TO DYNAMICS AX 2012” for free over here. It is highly useful material for anyone new to AX or even old hats looking for some new easy to use tips and tricks. I’ve been compiling some introductory basic training material for our company and this book will go along way in assisting me with this!

Thank you Murray Fife for this awesome content.

See his original post over here too.

https://www.linkedin.com/pulse/free-prize-download-introduction-dynamics-ax-2012-murray-fife?trk=prof-post

Update: Unfortunately this was only a limited time offer, but I would still encourage you to get hold of this book either from Murray Fife’s website http://www.dynamicsaxcompanions.com/ or from amazon  Here

Beware the “Catch”

Recently while debugging some legacy code I came across the following interesting observation regarding transaction scopes (ttsbegin, ttscommit) and the exception handling surrounding it. While walking the legacy code was observing very strange and unexpected behaviour and after some online investigation i found the following statement from Microsoft:

“When an exception is thrown inside a ttsBeginttsCommit transaction block, no catch statement inside that transaction block can process the exception. Instead, the innermost catch statements that are outside the transaction block are the first catch statements to be tested.”
(
https://msdn.microsoft.com/en-us/library/aa893385.aspx)

In its simplest form this means that for the following code:

 try
    {
        ttsBegin;
        try
        {
            throw error("Thrown Error");
        }
        catch (Exception::Error)
        {
            error("Inside Error");
        }
        ttsCommit;
    }
    catch (Exception::Error)
    {
        error("Outside Error");
    }

Prints the following results:
2015-07-23_0801

Now when it comes to a simple block of code like above one may say “Well that is simply silly coding”, however it becomes harder to anticipate results when that inner try…catch is within a method somewhere deeper inside the call stack (perhaps in standard code somewhere) e.g.

    void innerFunction()
    {
        try
        {
            ttsbegin;
            throw error("Thrown Error");
            ttscommit;
        }
        catch (Exception::Error)
        {
            error("Inside Error");
        }
    }
    
    try
    {
        ttsBegin;
            innerFunction();
        ttsCommit;
    }
    catch (Exception::Error)
    {
        error("Outside Error");
    }

Further more if your inner exception does cleanups or logging of information this will not happen by carelessly adding ttsBegins and ttsCommits around the calling code E.G. “writeErrorLog” will never be called in the following function regardless of what the writer of “innerFunction” does if the writer of the caller adds TTSBEGIN AND COMMIT

static void testTransactions(Args _args)
{
    void innerFunction()
    {
        while forUpdate select myTable
        {
            try
            {
            
                ttsBegin;
                if (someCondition)
                {
                    throw error("Throw Error");
                }
                else
                {
                    myTable.myField = "update";
                    myTable.update();
                }
                ttsCommit;
            }
            catch (Exception::Error)
            {
                writeErrorLog(strFmt("Failed on record %1", myTable.RecId));
                error("Inside Error");
            }
        }
    }
    
    try
    {
        ttsBegin;
            innerFunction();
        ttsCommit;
    }
    catch (Exception::Error)
    {
        error("Outside Error");
    }
}

I thought I would just paste these observations for anyone who like me has experienced this type of “strange behavior” in the past and didn’t know the exact reason and also as a warning to beware of the “Catch”.

Feel free to share your comments, observations and thoughts.


Setup DB Logging in X++ (Updating events)

Setting up AX Database logging via the user interface wizard can at times be a bit of a cumbersome and slow task, especially for tables that are not very common. The job below will simply set database logging for all fields on a specific table. Simply replace “InventSalesSetup” with the table name of your own choosing. As always, test this in a non-production environment to confirm that it performs suits your own needs.

static void setDBLogOnTable(Args _args)
{
    TableId tableId = tableNum(InventItemSalesSetup);
    DatabaseLog log;
    SysDictTable dictT = new SysDictTable(tableId);
    SysDictField dictF;
    Set fields;
    SetEnumerator   se;


    log.logType = DatabaseLogType::Update;
    log.logTable = tableId;
    fields = dictT.fields(false,false,true);
    se = fields.getEnumerator();
    while (se.moveNext())
    {
        dictF = se.current();

        log.logField = dictF.id();
        log.insert();
        info(strFmt("Adding field %1", dictF.name()));
    }
    SysFlushDatabaselogSetup::main();
}


Advanced AOT searching

Its always a great opportunity to interact with other AX developers and have the opportunity to learn from each other. A few weeks ago I published a blog post on searching the AX AOT in code for objects with specific properties, after the post went out I got a comment on the post of a much easier way to search the AOT from the frontend, that for some reason I have never really noticed before. So here is a quick way to do an advanced search of the AOT using a real situation I encountered this morning.

Example: Find all privileges in the AOT that have a specific menuitem as an entry point. e.g. “PurchFormLetter_PackingSlip”

1. Open an AOT and select the section of the AOT that you wish to search. Obviously the narrower the search the quicker it will be. I selected Security->Privileges.
2. Right click on the object. Click Find
Find
3. Select “All Nodes” in the search dropdown
Search_All_nodes
4. Select properties tab.
5. Right click on any field in the “Property” Column, Click filter by field.
FilterByField
6. Enter the name of the property you wish to search on. In my case I’m looking for all entry points that points that have the ObjectName set to PurchFormLetter_PackingSlip, so i enter “ObjectName”
SelectProperty
7. Click Ok.
8. Click the “Selected” checkbox
9. Enter the value you want to search for under “Range” e.g. “PurchFormLetter_PackingSlip”
SelectProperty210. Repeat steps 5-9 if you want to search for multiple properties.
11. Click Find now
12. You will now have a list of all the subobjects of whatever you selected in step 1 containing a specific property with a specific value.
FindResults


Note 1: You can also do some pretty neat searches using both the date and advanced tabs on this form so be sure to check them out too.

I hope this helps somebody who like me has just overlooked this for years.

Thanks Martin for the tip!


Disclaimer: For my specific example it may have been easier to use either the Security development tool or right click on the menu-item in AX -> Add-ins -> Security Tools -> View related security objects. But I needed an example for this post 🙂
SecurityFind

Determining what kernel hotfix has been installed on a System

When one is exposed to a new AX environment, one of the first things to do is check exactly what version of AX kernel is running. Obviously the easiest way to do this is to open the “about” box in AX and note the build number and compare it with the common build numbers on a site such as Axaptapedia or MSDN

http://blogs.msdn.com/b/axsupport/archive/2012/03/29/overview-of-ax-build-numbers.aspx
http://www.axaptapedia.com/Build_numbers

However on occasion when a kernel hotfix has been installed you will not find your build numbers on these pages. Searching for the build number on google, customersource or partner source also doesnt reveal anything. So here is the slightly round-about way I have found to find out what kernel hotfix has been installed. If you have an easier way, please let me know!

1. Take note of your kernel number in the about box of Dynamics AX
2. Confirm that the build number is not a major CU release by reviewing the sites above
3. Open up programs and features on the AOS, select “View installed updates”
4. Locate the section on “Microsoft Dynamics AX 2012 Object Server”. Take not of the KB article numbers listed
AX_installed_updates
5. Logon to Microsoft customer or partnersource.
6. Open any existing KB article e.g. https://mbs2.microsoft.com/Knowledgebase/KBDisplay.aspx?scid=kb;EN-US;2998197
7. Replace the KB number in the URL with the KB number noted in step 4. E.G:

https://mbs2.microsoft.com/Knowledgebase/KBDisplay.aspx?scid=kb;EN-US;2998197
becomes
https://mbs2.microsoft.com/Knowledgebase/KBDisplay.aspx?scid=kb;EN-US;2936094

This example reveals that we have a hotfix to resolve “SysGlobalObjectCache is not invalidated in multi Application Object Server (AOS) environment for CIL code”

I hope this helps anybody who has ever struggled to find out what kernal hotfixes are installed.
I also hope there is an easier way!

Remotely Controlling AOS services

I’ve recently moved into an environment with multiple load balanced AOSs that need to be controlled during code deployment and maintenance. If one needs to stop and start these services include either to logging into each machine individually or using the Windows services control panel to connect to the indivual machines to shutdown each AOS service.

Both of these options unfortunately are rather tedious and time consuming especially if you have numerous services to control and need to do it quickly. A simple way to do this is to batch/script the process using command line instructions to control the remote services. You can use sc.exe application to do so. Here are some examples:

sc \\[SERVERNAME] stop [SERVICENAME] e.g. sc \\JH-Srv-01  stop AOS60$01
sc \\[SERVERNAME] start [SERVICENAME] e.g. sc \\JH-Srv-01  start AOS60$01

This will issue the commands but won’t necessarily wait around while the services are stopping or starting.
Adding multiple of these commands to a single .BAT file will make you environment management life much easier! You can also use it to control other services like SSRS etc…

Note 1: You will obviously need the necessary permissions on each of these servers to do these tasks.
Note 2: The service name is the name listed under the properties (right click on the service, click properties) of the service not the one in the list of services.

2015-06-03_1515


Reference: https://support.microsoft.com/en-us/kb/166819

Install .Net 3.5 offline

Issue: One cannot install SQL Server required for Dynamics AX without .Net 3.5 on a server with limited internet access

Description: One of the obvious requirements for installing Microsoft Dynamics AX is SQL Server which in turn requires the .Net Framework 3.5 to be installed as one of Windows features. However both the Windows feature installer as well as the download versions of .Net Framework 3.5 require an active intenet connection to Window Update servers even if you have the Windows install files. If you do not have this connection due to some reason like a corporate proxy etc installation can be big problematic.

There is hope though. One can force the installation from the Windows disk using the following technique.

1. Insert your Windows installation disk into your computer or mount the disk image.
2. Open a command window running with Administrative privileges
3. Enter the following command: “Dism.exe /online /enable-feature /featurename:NetFX3 /All /Source:E:\sources\sxs /LimitAccess” replacing “E:\” with the path or drive of your windows install disk
4. Press enter and .Net 3.5 will install.

Many thanks to Reza Faisal for saving us many hours with your article on this, it has saved myself and my colleagues much frustration. View the article here: https://support.microsoft.com/en-us/kb/2785188


10. My checklist for debugging X++ code

As part of my series on “Things new X++ Developers Should know”. I have been writing a few basic howtos and checklists for new X++ Developers. These are really meant to be simple step by step guides to get new developers more productive by exposing the little secrets of the AX development that sometimes take years before discovering.

Today’s post is a checklist of things you need to have in place to ensure that you can debug X++ code.

  1. Enable debugging for your user. In an AX development window click on the tools menu item, then click options. Click on the development fast tab. Under debug mode set the option to “When Breakpoint”Enable_AX_Debugging
  2. Ensure your user is part of the local “Microsoft Dynamics AX Debugging Users” user group. On the machine which you are running the debugger on Edit your users and groups.
    2015-05-25_1545
    Expand the “Groups” section and double click on “Microsoft Dynamics AX Debugging Users”. Click “Add” and enter your domain name and click ok.
    2015-05-25_1546You will need to restart your user session by logging off and back on again
  3. Ensure the server is enabled for debugging (needed for serverside code). Open up the Microsoft Dynamics AX Server configuration console from Windows administrative tools. On the “Application Object Server” tab enable “Enable breakpoints to debug X++ code running on this server” and “Enable global breakpoints”
    Enable server breakpoints
  4. Enable client debugging options (optional/advanced for business connector debugging). In the Microsoft Dynamics Client configuration console in Windows administrative tools enable the following: “Enable user breakpoints to debug code in the Business Connector and Enable global breakpoints to debug code running in the Business Connector or client.
    2015-05-26_1449
  5. Ensure the debugger is installed on the client machine. Run the Microsoft Dynamics AX installer and ensure the “Debugger” (found under development tools is installed)
    2015-05-26_1452
  6. If your code is running in CIL:  You can either follow the steps listed on MSDN https://msdn.microsoft.com/en-us/library/gg860898.aspx or for simple debugging (i.e. logic errors) set your user to not run business logic in CIL via your user options form:
    2015-05-26_1510
  7. Finally and most obviously you need to create breakpoints. You can do this in three ways.
    1. Navigate to the line of code that you want to debug. Press F9
    2. Navigate to the line of code and press the “Red circle” on your toolbar.2015-05-26_1502
    3. Finally you can physically type “debug” in your code to create a breakpoint. However this will enable it for all users in the system, not just for yourself.
      2015-05-26_1503

I hope this checklist will help somebody stuggling with their debugging in AX. Please let me know if there are additional tips for debugging that this list may be missing.

For some additional details on debugging see MSDN:
https://msdn.microsoft.com/en-us/library/gg860898.aspx

Find all Menuitems Linked to a Form

For diagnostics purposes it is often useful to search the AOT for all objects matching cetain properties. For example you may want to find all display menutitems that are pointing to a specific form. The below job illustrates how to simply traverse the Display Menuitems node in the AOT to locate all items who’s “ObjectType” is “Form” and object is a specific form name. E.G. “PurchReqTable”.

static void FindMenuItemsForForm(Args _args)
{
 #AOT
 str find = "PurchReqTable";
 TreeNode root = TreeNode::findNode(#MenuItemsDisplayPath);
 TreeNode current;
 TreeNodeTraverser trav = new TreeNodeTraverser(root,false);
 
 current = trav.next();
 while (current)
 {
 if ((current.AOTgetProperty('ObjectType') == "Form") && (current.AOTgetProperty('Object') == find))
 info(strFmt("Found menuitem %1",current.AOTname()));
 current = trav.next();
 }


Search_AOT

Adapting this to search other nodes is as simple as changing the original node instantiation to search a different path as well as changing the AOTgetProperty() method to search through the properties relevant to you.

Happy Daxing

Original community post: https://community.dynamics.com/ax/f/33/p/161258/387257#387257

14. Using Alt+[Up/Down] to rearrange the order of elements in the AOT.

As part of my series on “Things new X++ Developers Should know”. I have been writing a few basic howtos for new X++ Developers. These are really meant to be simple instructions to get new developers more productive by exposing the little secrets of the AX development that sometimes take years before discovering.

Today is the simple trick of moving elements up and down in list in the AOT using your keyboard. E.G. Re-arranging fields in a grid control or field group. Sometimes the mouse re-arranging produces unexpeded results and is quite frankly much slower.

  • Simply highlight (click on) an element of an object that makes sense to re-order e.g. a column in a form grid.
  • While holding in the “ALT” key use the up and down arrow keys of your keyboard to move the object up and down in the list

Reorder_AOT_Elements

Notes on this functionality:

  • This functionality only works where it actually makes sense i.e. where where order actually matter like on grids and field groups. E.G. Moving your control above “methods” (in the screenshot) will have no effect and will automatically move it back down to directly below “methods” on re-opening the aot element.
  • This functionaly will do nothing on set elements in an Object e.g. “Methods”, “Datasources”, “Designs”, “Parts” etc…
  • If you’re a little OCD like myself and would like to re-arrange the fields (in the fields node) on a table object they will move when using Alt+[Up/down], but the change will not be permenant, even after saving. Field order doesn’t really make much difference in AX, apart from readability in the AOT. So if you want the primary key to be at the top of the list, then you must create it first (I haven’t found a workaround yet).
  • The same applies for ordering of methods in classes. The methods physically move but the change is not permenant
  • As above, even though you are physically able to, reordering the tables in the AOT makes no difference. They will always be revert to being alphabetical after re-opening the AOT.
  • Re-ordering objects in an AX development project does work! The elements will stay in the order that you arrange them.


8. Locate specific AOT object without scrolling

As part of my series on “Things new X++ Developers Should know”. I have been writing a few basic howtos for new X++ Developers.

Today’s post relates to quickly navigating to specific objects in the AOT without endless scrolling.

So often when working over the should of new developers or consultants exploring the AOT I see them scrolling endlessly or dragging the scrollbar back and forth for a while before finding the object they are looking for.

A common technique to navigate through lists in both Windows (e.g. My computer etc) and windows based environments (SQL management studio etc..) is to simply start typing the name of the object you are looking for. Windows automatically moves to the first object matching the sequence typed.

AX is by no means an exception to this rule. Simply click and expand the main node of the object you are looking for e.g. “Forms”
AOT Navigation Forms
and start typing E.G. “PurchReqT…..”
AOT_Navigation_Type_PurchReqT
As you type AX will move to the first object found matching what you have typed so far..
E.G. P moves to PartitionAdministration,  Pu to PurchArgreement etc….

There are some bonus features when using this in AX:
1. You can always see what you have typed so far by looking at the bottom left of your screenAOT_Navigation_Status_Bar
2. The typing timeout is long compared to applications like SQL etc where you need to have taken a speed typing course to get this right. As long as you still see the search term in the bottom you can just continue typing (this normally takes around 7 seconds or until you use your keyboard arrows or mouse to do something different

I know this may be a very obvious tip, but I’ve witnessed too many people taking forever to find objects by scrolling to not include this in the “Things new X++ Developers Should know” series.

Enjoy


4. Drill through to code from Info log

As part of my series on “Things new X++ Developers Should know”. I have been writing a few basic howtos for new X++ Developers.

Today’s post relates to quickly navigating to the source code from where an info log error, warning or information message is called from.  It took me a while to figure out that for many info log messsages you can simply double click on the message in the info log window and the code that called the message will be displayed for you.

E.G. If you see the normal error log icon or warning icons with a small arrow in the bottom left corner, you are normally able to double click the message to see the code behind it. These icons look like this:

InfoDrillDown2

Error Log

Infolog Info

Info Message

Warning Message

Warning Message


Simply Double click the message as below

InfoDrillDown

To be presented with the code that called it.

InfoLog5


NOTE 1: If you have your “Execute business operations in CIL” user option enabled, a lot of business logic like postings etc will not allow you to drill down.

NOTE 2: If the code calling the info message makes use of the SysInfoAction parameter, you will be taken to an alternate form specified by the developer and not the source code. (See Axaptapedia Article)

3. Drilling down to the parent type of an object in the AOT.

As part of my series on “Things new X++ Developers Should know”. I have been writing a few basic howtos for new X++ Developers.

Today’s post relates to quickly navigating to the source or parent type of an object in the AOT. This is often useful to drill through to a parent object to discover, debug or modify properties and code. The following are some examples of drill-downs you can perform

1. Open the Data Dictionary Table from a Form’s datasource
2. Open the Data Dictionary Enum used from a table field
3. Open the Extended Data Type used by a table field
4. Open the AOT Form object (or class, report etc) from a Menu-item object
5. Open the Data Dictionary Table object from a Query datasource
6. Open a parent EDT from an extended EDT
7. Open a parent class from an extending class.

Steps

1. Open the object in question e.g. a Table field.
2. Right click on the field.
3. Select “Add-ins”
4. Select Open new Window
5. Click “Open used Extended Data Type”
2015-05-08_1521

6. The parent type is now displayed in a new window. In this example the ProjId EDT is displayed
2015-05-08_1524

7. Determine Field name of control on an AX Form

As part of my series on “Things new X++ Developers Should know”. I have been writing a few basic howtos for new X++ Developers.

With some of the more complex forms in AX 2012 it can sometimes be quite tricky to navigate through the form hierarchy in the AOT to debug which table and field certain controls on your form are bound to. So today I’ll cover how to determine the Table and Field name or the name of a control directly from an AX Client form. A quick and easy way to do so is to simply use the “personalise” function in AX.

NOTE: This requires you to have system administrator privileges (which you probably have if you are a developer)

1. From any form in AX. Right click on the form control or field that you would like to diagnose.
2. Click “personalise”
Personalise_001


3. From the personalise screen you can now view the following:

Personalise_002


#1. The location in the Design node of the AOT where the control resides
#2. The name of the Control in the AOT
#3. The name of the AOT Table name that the control is bound to
#4. The name of the datasource on the form that the control is bound to (normally the same as the Table Name)
#5. The name of the field on the table that the control is bound to


2. Drilling down to the AOT from an open form

As part of my series on “Things new X++ Developers Should know”. I have been writing a few basic howtos for new X++ Developers.

Today we cover how to determine the AOT name of the current form that you are accessing and edit it directly without having to go through the tedious process of navigating/searching in the AOT. This can be very useful in increasing productivity as well as debugging functionality

1. From any form in AX right click on an control.
2. Click “Personalise”.
Personalise


3. Select the “Information” tab.
4. The AOT name of the form is visible under “Form name”.
5. Click Edit to acess the form in the AOT.
Personal_2

Note: This won’t work for forms created in code like dialogs etc..

Things new X++ Developers should know

developer-iconSince my start in X++ development over 6 years ago there are many small things that I have learnt that I wish I had known from the start. Small things that won’t necessarily help you post a stock journal from code or perform complex integration tasks, but none the less makes your day ever so much more productive. If you are a seasoned developer you will most probably already know most of these, but I thought I’d put them all down in a neat list for new guys to go through. Here are some of my favourites along with links to short articles on how to do them. (I will hopefully add some more over time).

1. Keyboard Shortcut to view properties of an AOT element: Simply Hit “Alt+Enter” on any AOT element to view its’ properties list. Much quicker than fumbling with right clicking on the mouse. (view more shortcuts)
2. Drilling down to the AOT from an open form: Instead of reverse engineering forms from menu structures or navigating in the AOT to edit a specific form, simply right click on any form, click “Personalise”, select the “Information” tab, click on the “Edit” button next to the form name. (view details)
3. Drilling down to the dictionary type of an object in the AOT. E.G. Edit enum or EDT being used by a field on a table. Navigate to an element in the AOT e.g. A enum field on a table. Right click on the element, click “add-ins”, click “Open in new Window”, click “Open used Enum” etc…. (view details)
4. Drill through to code from Info log – Quite often the info log will allow you to drill down into the code the called the error message. If you notice a small arrow on the error icon you can simply double click on the line to take you to the code. (view details)
5. Infolog code drill down does not work if code is running in CIL. As an addition to the above you will not be able to drill down to code if it is running in CIL. For DEVELOPMENT/DEBUGGING purposes only you can simply disable code from running in CIL in your User Options.
6. Run AX as an alternative user. For debugging security or processing workflow it is often needed to run AX as an alternative user. Simply press Shift and right click on the AX icon on your desktop. You can then select “Run as different user”. (view more)
7. Determine Field name from control on Form. Sometimes you need to quickly find out the database table and field that is shown on a form without navigating through the complex AOT form. Simply right click on the field, click “personalise”. Under “System Name” you will see the following: Control name, Datasource Name, Table Name and finally Field Name. (view details)
8. Locate specific AOT object without scrolling. This may be an obvious one as Windows uses this technique in many other applications. Open the AOT and expand and click on the main node of the object you are looking for e.g. Classes. Then simply type the name to navigate to the specific object. (view details)
9. Creating an Development Environment shortcutAs a developer you don’t necessarily want to login to the Dynamics AX front end whenever accessing the AX shortcut, but rather want to open a development workspace directly. To do so right click on the AX shortcut on your desktop, click properties, on the shortcut tab in the “target” field add “-development” after the path to the Ax32.exe file. (View step by step)
10. Enabling breakpoints / debugger. One of the most important tools in a developers toolbag is the debugger. There are a few items on the checklist that you should ensure before you can successfully debug code: View them here.
11. Enabling viewing of Layer and Models. In a complex AX environment it is very useful to know what model and layer an object forms part of in order to search for patches or fix yourself. You can easily enable the AOT to display these by navigating to: File -> Tools -> Options -> Development -> Application Object Tree -> Application Object layer -> Select “Show All layers” and Application Object Model -> “show on All elements”.
12. AX Layer Config files. Create AX shortcut files to allow you to easily logon to the layer of your choice. View how here. (link available soon)
13. Profiler / SQL Trace. You can easily make use SQL Tracing or profiler to see the exact SQL being executed behind the scenes. This can be very useful for debugging purposes. (link available soon)
14. Using Alt+[Up/Down] keys to reorder AOT elements. To rearrange object elements like controls on a form grid simply hold in ALT and press the Up and Down keys to rearrange its order in the parent. (view details)

Anyway thats my list for now. Please let me know of any other quick tips and tricks that you think new developers (or old) should know about!

Keep a lookout for some more detailed explainations on some of these coming up in the follow days.

For some more advanced tips, tricks and coding patterns please also checkout the knowledge base at dynamicsaxtraining.com


Environment based Dynamics AX Color coding

Before I start: As a disclaimer, I’m posting this to show a potential way to solve this issue or similar issues, and to spark thought not necessarily as a production recommended solution.

I have had the requirement in the past to ensure that our environments (DEV, UAT and PROD) are reliably color coded to reflect the true environment that is currently open. This should not be application dependent (code only existing in individual environements) or database dependent (settings residing in the database) as these may change, be restored or be overwritten.

The best solution out there on how to physically color forms is Palle Agermarks’ solution. I would recommend you look at his code to get started as this is not the primary purpose of this post.

This solution however relies on a database table with the required color settings. This means that if a database is restored the color settings in UAT may reflect the color settings in Prod. For some purposes this may be ok or indeed what is needed, but we want to be able to clearly and confidently differentiate between our environments without having to remember restore scripts etc.

To do this I took Palle Agermarks‘ color coding code and modified it to look (in code) at what the current database is and color code my environment accordingly. Unfortunately this does require a bit of hard-coding a set of database names, but the colors will change correctly regardless of database or application loaded.

The key to this is to use SysSQLSystemInfo::construct().getLoginServer(); to determine the current database server you are connecting to.

public void setFormStatusBarColor()
 {
 int a,r,g,b;
 Color color;
 str serverName = SysSQLSystemInfo::construct().getLoginServer();
 if (formRun)
 {
 switch (serverName)
 {
 case "MYDEVSERVER" : color = "33CC33"; //green
 break;
 case "MYPRODSERVER" : color = "FF9933"; //red
 break;
 case "MYUATSERVER" : color = "0066FF"; //blue
 break;
 }
if (color)
 {
 a = 254;
 [b,g,r] = WinAPI::RGBint2Con(hex2Int(color));
 formRun.setStatusBarBackgroundColor(a,r,g,b);
 }
 }
 }


Some variations on this, depending on your setup, would include looking for keywords in your server names instead of the whole name to determine what environement is being used. E.G. Does servername contain “DEV”. This may make it a bit more flexible and re-usable.

Creating a Custom Workflow Due Date Provider

Although not often needed within workflow, one sometimes has the requirement to set due dates, escalation dates etc based on some sort of custom criteria E.G Complete by My Birthday or Complete at least one day before the documents requested date. Recently on the Dynamics AX forum this question was raised (https://community.dynamics.com/ax/f/33/t/156937.aspx) so I thought I’d write up a “short” post on how to create a custom WorkflowDueDate provider.

1. Create a new class in the AOT that implements “WorkflowDueDateProvider” e.g. MyCustomDueDateProvider
public class MyCustomDueDateProvider implements WorkflowDueDateProvider
{
}

2. Create method getCalendarTokens

The getCalendarTokens method will return a list of items that will display in the Time Limit’s Calendar option in your workflow configuration.
D2
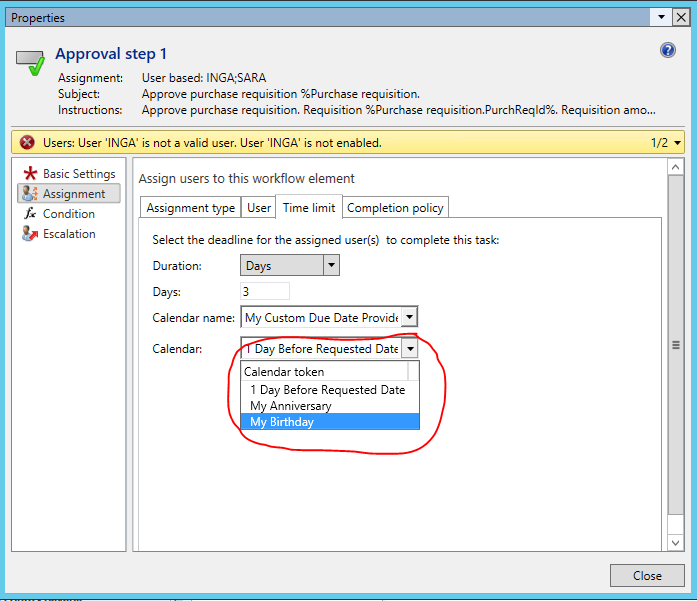
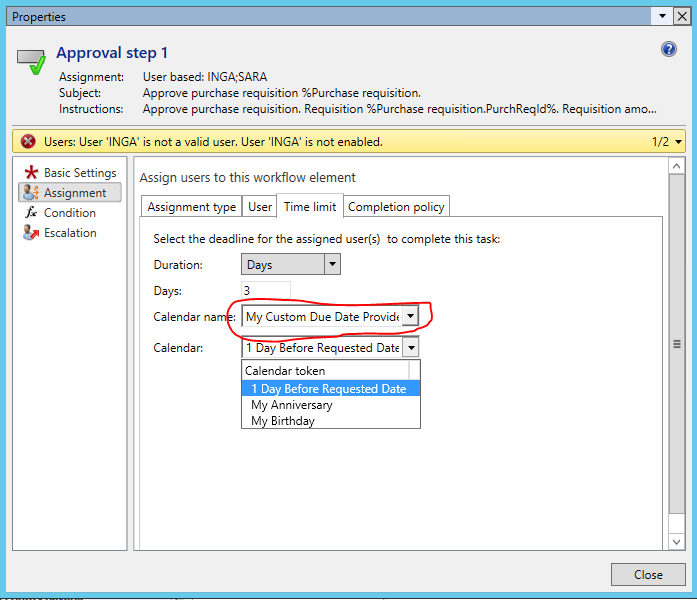
You can return any list of items here that you would like to allow the user to select for resolution. For example in the standard Calendar Due Date provider a list of all the configured calendars in the system. However you could customise this to return an entirely personal list of options such as “My Birthday” and “My Anniversary” that will set the workitem’s due date to my next birthday (26th of June 2015) or next anniversary (24 of March 2016). You could also provide an option that is document specific such as “1 Day Before Requested Date”. For this example I am going to use these options to illustrate the true arbitrary nature of the tokens.

public WorkflowCalendarTokenList getCalendarTokens()
{
    WorkflowCalendarTokenList tokens = WorkflowCalendarTokenList::construct();
    ;
    tokens.add(“MYBIRTHDAY”, “My Birthday”);
    tokens.add(“MYANNIVERSARY”, “My Anniversary”);
    tokens.add(“1DAYBEFOREREQ”, “1 Day Before Requested Date”);
    return tokens;
}

3. Create the resolve and resolveNonUser methods

After creating the tokens list we need to create a way to resolve the specific option that the user has selected in his configuration. I’ve kept my code very simple (and hardcoded) to illustrate how this works.

public WorkflowDateTime resolve(WorkflowContext _context, WorkflowCalendarToken calendarToken, WorkflowTimeSpanMinutes _timeSpanMinutes, WorkflowUser _userId)
{
    Date tmpDate;
    WorkflowDateTime ret;
    PurchReqTable req;
    ;
    if (!_calendarToken)
        throw error(“@SYS105450”);

    if (_calendarToken == “MYBIRTHDAY”)
    {
        tmpDate = str2DateDMY(“26062010”); //specific date
        ret = DateTimeUtil::newDateTime(tmpDate, 0);
        ret = MyCustomDueDateProvider::nextDate(ret);
    }
    else if (_calendarToken == “MYANNIVERSARY”)
    {
        tmpDate = str2DateDMY(“24032010”); //specific date
        ret = DateTimeUtil::newDateTime(tmpDate, 0);
        //next date is a custom method that simply finds the next occurance of my birthday by adding years to the provided date until it is greater than today.
        ret = MyCustomDueDateProvider::nextDate(ret);
    }
    else if (_calendarToken == “1DAYBEFOREREQ”)
    {
        if (_context.parmTableId() == tableNum(PurchReqTable))
        {
            //retrieve original document form WorkflowContext
            req = PurchReqTable::find(_context.parmRecId());
            ret = DateTimeUtil::newDateTime(req.RequiredDate,0);
            ret = DateTimeUtil::addDays(ret, -1);
        }
       else
        {
            throw error(“Cannot use 1DAYBEFOREREQ with any document except PurchReqTable”);
        }
    }

return ret;
}

For this example we are not going to use user specific resolution, so the resolveNonUser and resolve methods will return the same values

public WorkflowDateTime resolveNonUser(WorkflowContext _context,
WorkflowCalendarToken _calendarToken,
WorkflowTimeSpanMinutes _timeSpanMinutes)
{
return this.resolve(_context, _calendarToken, _timeSpanMinutes, ”);
}

4. Create new and construct methods

protected void new()
{
}

public static MyCustomDueDateProvider construct()
{
return new MyCustomDueDateProvider();
}

5. Create a due Date provider in the AOT.

1. Navigate to Workflow -> Providers -> Due Date Calculation
2. Right click, click “new Due Date Calculation Provider”
3. Right click on your new provider and click properties.
4. Provide an appropriate name e.g. “MyCustomDueDateProvider”
5. Provide a relevant label. This will appear in your workflow configuration under “Calendar Name”
D1
6. Depending on how you have coded your provider you may need to select an Association Type of company and AvailableForAllWorkflowTypes as “no” if you rely on company specific information or on record specific information.
7. Most importantly: Select the the class that you have created under “ProviderClass”

6. Perform CIL Compile and restart your client
7. Configure your workflow:
 Open your workflow configuration and navigate to the place where you would like to make use of your new functionality. E.G. Any Assignment’s “Time Limit” tabYou should now be able to select your provider under the “Calendar Name” option and select the resolution type under the “Calendar” option. Note our code didnt make use of the “_timespanInMinutes” parameter so the Duration option can be set to anything. We could have used this parameter to increase the flexibility on the “Before Requested Date” option if necessary.

I hope this assists someone sometime! Happy Daxing

Workflow Notifications to Custom list of Users

Problem statement: It is quite frequent in workflow in Dynamics AX that one would like to notify users when certain approvals have occurred, tasks have been completed or when errors occur. This is pretty easy to accomplish out of the box with Dynamics AX by using the notifications on approvals, tasks or on the workflow as a whole. However the options are pretty limited and not very dynamic (especially in AX 2009) and up until AX2012 you have only really been allowed to assign to specific users (i.e. by user id). This means that it is very difficult to accomplish complex notifications such as notify the following people when a document has been approved: Document Creator, Project Manager for the document’s project and all users assigned to the “Accountants” security role in AX.

AX 2012 however has now allowed you the ability to make use of “Participant Providers” as an assignment option in notifications.
participant

This means that you can create a Custom “notification” participant provider for your system that can resolve any number of personalised lists of users as above.

For example we created a particpant provider with a couple these lists. In our custom participant provider we returned a unique token per list e.g. “Originator, Project Manager, Requester and CEO” and “Originator, Project Manager, Financial Manager and CEO”.

In the resolve method of the participant provider we then retrieved the workflow document out of the workflow context object and returned the “Created by” user,  looked up the project on the document and returned the associated Project manager and finally looked up the Financial Manager and CEO from a custom parameters table in AX and returned them as well.

The actual creation of a custom participant provider is beyond the scope of this article but you can find some more resources over here:

https://workflowax.wordpress.com/2009/10/30/participant-provider-example/

I hope this sparks some thought and is useful to some:

Inspired by: https://community.dynamics.com/ax/f/33/t/155436.aspx